
How to: Bleach your Eyebrows
Bleaching my eyebrows was always a part of my regular beauty routine back when I had blonde highlights in my hair or when my hair was a lighter shade of brown. Everyone has their own preference and opinion about matching your eyebrows to your hair color or just bleaching/coloring the eyebrows in general (some like it, some don't), but when done properly, it can really enhance your look.
My eyebrows are very thick, coarse, dark, naturally high arched, non-symmetical (meaning they don't match) and grow quick. Or in other words, nightmare brows. So, I usually have a hell of a time getting them to match every day.
Because I have quite a bit of filling in to do, they can sometimes look too harsh, dark or obvious. I also think that when my brows are super dark, it can create too much emphasis on them, taking away from other features of my face. When they're lighter, the emphasis is taken off my brows and creates more emphasis to my eyes and lips.
In this post, I'm going to briefly go over how you can achieve lighter eyebrows in some really simple steps.
Tools Needed:
- Facial Bleach (I'm using Sally Hansen Creme Hair Bleach for the face)
- Spoolie (or a clean cosmetic wand)
- Vaseline (optional)
- Purple Shampoo or Hair Toner (optional - I'm using Clairol Shimmer Lights Shampoo)
 My Eyebrows before and after bleaching them.
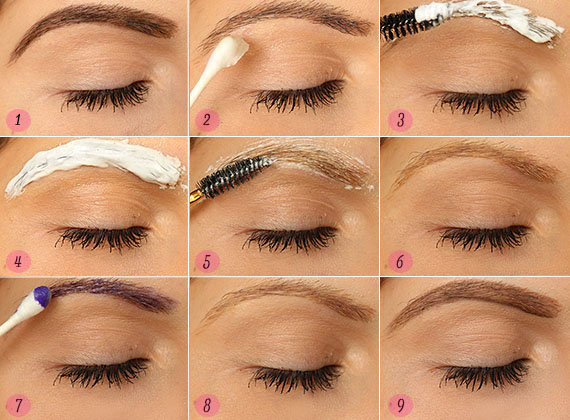
- Start out with clean, freshly groomed eyebrows. (In this photo I've filled my eyebrows in with my regular brow product to show you the difference in the before and after photo)
- Using a Q-tip, apply vaseline on the skin around the eyebrows. This will prevent the bleach from touching your skin and causing irritations. This step is optional, but if your brows are freshly tweezed, I highly recommend applying vaseline, as the bleach can slightly burn freshly tweezed skin.
- Mix your bleach as directed on the instructions and take your spoolie and comb it through your brows. You want to bleach each hair evenly, so work the spoolie back and forth so the hairs are coated on all angles.
- Heavily coat your eyebrows in the bleach mixture so they are completely covered. If you only want to slightly lighten them, you may only need the mixture on your eyebrows for about 5 minutes or so. I wanted my brows to be extra light, so I left the mixture on for 10 minutes.
- Remove the bleach mixture from your eyebrows using your spoolie or a damp cloth.
- Rinse and pat your eyebrows dry.
- Using a Q-tip, apply purple shampoo to your eyebrows and let them sit for around 10 minutes.
- Rinse and pat dry. You can see the difference from step #6 where my brows have yellow/orange tones, and #8 where they are more neutral.
- You're finished! This is what my brow looks like filled in with a lighter brow product.
Some things to keep in mind:
- If you have very fine and/or sparse eyebrows, the bleach will develop quicker. Keep a close eye on them and with a cotton swab, wipe a little off every couple of minutes to check on them, otherwise if you keep the mixture on for too long, you might end up with light blonde eyebrows.
- If you have very dark brown eyebrows, they will always come out with brassy tones. Think of it as adding bleach to dark hair.. It's always orange before you dye or tone it. Bleach lifts color, it doesn't tone.
- If your brows came out too light or orange, don't panic. They may look super brassy on the first day or two, but it does settle in well and the brassiness will fade throughout the week. You will be filling them in with a brow product anyways, so after they're filled in, any orangey tones aren't noticeable.
- A toner isn't necessary (in fact, most of the time I skip the purple shampoo) but I wanted to show you that step anyway if it's something you'd be interested in. I don't want to tell you to go out and purchase a bottle of dye (that can only be used once) just to use a tiny bit for the brows. I've never used a specific toner, but if I were to purchase one, I'd get a semi-permanent ash or cool blonde or light brown dye and apply it to my brows after I've bleached them. I like using a purple shampoo because if you bleach them regularly, getting a bottle of purple shampoo would be a better value. I use the purple shampoo on my hair as well to get rid of the brassy tones!
- If you are going to use a toner, please use extreme caution as you don't want it near your eyes. Apply a little product at a time with a q-tip, making sure not to overload them with product so they won't drip and get in your eyes.
Results may vary, but I bleach my eyebrows once a month for upkeep.
It's super easy and takes a short amount of time. If it's something you'd like to try, I'd say go for it! It only lasts for a few weeks anyways, so if you don't like it, don't worry, it fades gradually and is almost completely gone in 3 weeks.
It's super easy and takes a short amount of time. If it's something you'd like to try, I'd say go for it! It only lasts for a few weeks anyways, so if you don't like it, don't worry, it fades gradually and is almost completely gone in 3 weeks.
 Source